"Now to him who is able to do immeasurably more than all we ask or imagine, according to his power that is at work within us, to him be the glory in the church and in Christ Jesus throughout all generations, forever and ever! Amen." Ephesians 3:20-21

Monday, February 13, 2012

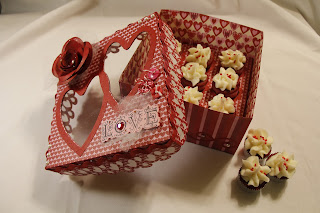
Valentine's Project

Well, no excuses...I have been too lazy to blog lately (period).

I decided that I needed to share my Valentine's Project because I have never entered a crafting contest before.  This is what I made for the the Valentine's Challenge at SVG Cuts.  I don't expect to win but it was a good experience.  I would really like to get on a design team someday. When I started thinking about what I was going to make for the challenge I decided I would do something practical.  I love to give gifts to others and I usually try to bake something for them.   My sweet daughter-in-law loves cupcakes so I decided this would be a good place to start.   I make a mini-cupcake gift box.  the hardest part was not eating the cupcakes.  I made Red Velvet with Buttercream icing...yummo!  Please feel free to email me if you want details on how to make the box.  All of the files were either from SVG Cuts or I designed them.  The stamp is from Punkin Patch Stamps.


Any advice on how to get on a design team...please share.

Tuesday, November 22, 2011

Pinterest Week Three-One of my original recipes and one pinterest

Ok…this weekend was crazy so I am just now getting my blog done…sorry for all “two” of my faithful readers (including my mom).  I am “knee deep” in finishing my next to last graduate class so my crafting and cooking are definitely on the back burner. 

This week I made one of my original recipes.  Well, I need to explain my definition of “original”.   There is a restaurant in Lubbock that my family loves and they make this wonderful soup.  One day I asked for the recipe and of course, the restaurant did not feel compelled to give it to me…I can’t blame them…they to make a living also.  However, this gave offered me a challenge…and I am always up for a challenge in the kitchen.  (Food Network is my destiny…LOL) So here is my version of Green Chile Potato Soup.  I hope you enjoy this treat on a cold winter day.  It will warm you up for sure.
Shelley's Creamy Green Chile and Potato Soup

Shelley’s Creamy Green Chile and Potato Soup
5 lbs of potatoes-boiled and chopped (I shred the potatoes with the skin on.)
1 ½ sticks of butter
8 cloves of fresh garlic
1 sweet onion, chopped
3 stalks of celery, chopped
1 container of frozen hot green chilies (12-14 oz), thawed
6 strips of bacon; chopped finely
1 quart of chicken broth
4 cups of milk
2 lbs of Velveeta
2 cups of smoked Gouda or cheddar cheese 
Salt and pepper to taste

Cook bacon in large stock pan until brown.  Add butter and sauté onions, celery and garlic until tender.  Add green chilies.  Simmer for a few minutes.  Add broth and milk, simmer until warm.  Add Velveeta; allow melting at med-low heat, stirring often.  Add Gouda or Cheddar cheese, allow melt.  Add cooked potatoes.  Allow to heat through. 
Make:   7 quarts plus 
My Pinterest Recipe:
This weekend I decided to try Caramel Pecan Bread…yummy!   It is super easy and quite tasty.  I got the recipe from Plain Chicken.   You really need to check out her recipes. 
I did not vary this recipe much, but I can see some great potential on making it my own version.   I will definitely skip the caramel sauce next time and use brown sugar and milk instead.  

Caramel Pecan Bread

Here’s the recipe:

Caramel Pecan Bread
6 Tbs butter
1/2 jar caramel ice cream topping ( I use the kind in a squeeze bottle and use 1/3 cup)
½ teaspoon of cinnamon
1 teaspoon of vanilla
1 cup chopped pecans 1 can biscuits (10 count - I used Pillsbury Golden Layer biscuits) 

Preheat oven to 350. Melt butter in 8-inch saute pan over medium heat. Remove from heat, stir in caramel and pecans.  Add cinnamon and vanilla.  Cut each biscuit into 4 pieces and toss in caramel mixture.  Bake for 20 minutes, or until golden brown.

I hope you have an amazing, blessed Thanksgiving.  I am thankful for each and every one of you.  I hope to have lots of stuff to post throughout the holidays.  If you come across a great recipe, let me know.  Blessings to all.

Saturday, November 12, 2011

Pinterest Week 2-Sugar and Spice

This weekend I had two homeruns with my Pinterest recipes.  Actually, Tony said they were “out of the park” homeruns…I am guessing that is good!  Of course, true to my nature, I made modifications to fit my tastes and likes.  I will post the original website if you are less adventuresome than me.  I like to “walk on the wild side” with my cooking…I should have been a mad scientist…just kidding.  I would surely blow something up. 

Earlier this week, Tony asked if we could have biscuits and gravy for “cheat” day.  Now you have to realize my mother-in-law makes the best biscuit in the land so this is a hard one for me.  Of course, it is hard to deny those big brown eyes so I relented.  I decided to spice the biscuits up a little.

Here is the result…

Green Chile Cheddar Biscuits
Makes 12 big biscuits…I baked 6 and froze 6 (uncooked) for another time. 
Ingredients:

2 cups all purpose flour
2 teaspoons of baking powder
1 teaspoon of sea salt
½ teaspoon of black pepper
½ teaspoon of baking soda
2 ½ tablespoons of buttermilk powder *
*(I suggest everyone keep this is stock…no more running to the store just for buttermilk which in turn goes bad because no one will drink it the rest of it…yuck)
½ cup (1 stick) unsalted butter, small cubes
14oz container of frozen HOT Hatch green chiles, thawed and drained.
(I squeeze them to get all the extra water off of them.) 
1 cup, sharp cheddar cheese, shredded
2/3 cup of water

  1. Preheat oven to 400 degrees.  My oven was slightly hotter but I will adjust the temp. next time.
  2. Place flour, baking powder, salt, pepper, soda, and buttermilk powder in bowl of mixer.  Mix the ingredients together with paddle attachment. 
  3. Add cold butter in small cubes.   The paddle does a great job incorporating the butter but you can do this with a pastry blender if you don’t have mixer.  Continue mixing until you have a coarse mealy texture. 
  4. Fold in the chiles and cheese.
  5. While continuing to use the paddle attachment, slowly add water.  You may not need all the water.  Mix until the dough comes together. 
  6. Form dough into an 8 to 10 inch disc about ½ thick on a floured surface.
  7. Using a 2 inch circle cutter, cut 12 biscuit and place on baking sheet.
  8. Bake for 16 minutes or until golden brown.  Remove from oven and allow to cool slightly. 

Serve with sausage gravy and/or jalapeno jelly. 

Adapt from Spoon Fork Bacon

Here is my Pinterest advertisement…if you have not joined Pinterest…you are missing totally missing out on the fun (addiction).  You will need an invitation to join…if you need one, let me know.  If you are already enjoying Pinterest (addiction), please follow me.  Also I would like to hear your thoughts or suggestions as I build my blog following. 

My second creation of the weekend…actually this one was made first but eaten second.

Reese’s Fudge Pie (I know…enough said)…how can you go wrong with Oreos, fudge, Reese’s cups, peanut butter mousse and more chocolate?  Tony said that this is his all-time favorite!  Can you believe that?  What an accomplishment…his ALL-TIME favorite!  This man has tasted some desserts in his life and to hear those words made my day.  He is so good for my cooking ego.  Although he is now in a chocolate, peanut butter induced coma.  BE WARNED…a small piece of this pie is all you need.  If you are taking this pie to a party or making it for company…cut the pieces super small or you will be wasting it.  And frankly, it is too good to waste. 

Here is the 411 on the pie…

Reese’s Fudge Pie

You will want to use a springform pan for this one.

Ingredients~
For the crust:
½ package of crushed peanut butter filled Oreos
¼ cup of butter

Fudge:
1 (14 oz) can of sweetened condensed milk
2 cups of milk chocolate chips
1 cup of semi-sweet chocolate chips
¼ teaspoon of sea salt
2 teaspoons of vanilla
1 (8 oz) package of Reese’s minis (reserve for later use)

Peanut Butter Mousse:
1 cup of peanut butter
1 cup of powdered sugar
8 oz of cream cheese
1 ½ cup of Whipped topping

1/2 cup of melted chocolate for drizzle
1 tablespoon of heavy cream

For Crust:
Crush the Oreos.  (I find it easier to scrape the filling out of the cookies, crush the cookies and then mix the peanut butter filling back into the crumbs).  Add the butter to the crumbs and mix together.  Spread into the bottom of the springform pan.  Bake at 350 for 8 minutes.    Let cool.

For Fudge:
Mix the chocolate chips, milk, salt and vanilla together in a saucepan.  Melt together over a medium-low heat, stirring continuously.  Continue until all chips are melted and smooth.

Spread over the crust.  Press Reese’s minis into the fudge.  Allow to cool completely before adding mousse. 

For Peanut Butter Mousse:
Mix peanut butter, cream cheese and powdered sugar together in a bowl with a mixer until combined and smooth. 
Fold in the whipped topping.
Spread on top of cooled fudge.

Melt chocolate with cream and drizzle over the mousse.  I use a ziplock bag to drizzle the chocolate. 


Chill completely before serving (at least a few hours).

Adapted from Cookies & Cups

I hope you have enjoyed this weekend version of Pinterest on Review by Yours Truly.
Saturday, November 5, 2011

Pinterest weekend-week one

I am going to try to make a new Pinterest recipe every weekend (only on the weekends because my waistline can't handle more than that) for a year...maybe I can keep up. If you have suggestions or want me to try something specific please let me know. I will try to keep you posted on my successes (or failures). I will let you know what my critics (the boys) think.

Today, I have two specials (recipes to follow). I will try to give credit to all involved but please realize that I am the queen of tweaking recipes and not writing it down..nothing turns out the same twice.


The first is French Toast Casserole

1 loaf of French Bread (cut into 1 1/2 inch slices)
1/2 cup butter
3/4 cup brown sugar
10 eggs
1 1/2 cup of milk with a little heavy cream for good measure(1/2 cup)
1 1/2 teaspoon of cinnamon
1 teaspoon of ginger
1 tablespoon of vanilla
1/8 teaspoon of salt
1/2 pecans

Melt butter and brown sugar and place in the bottom of 9 x 13 baking dish.

Add bread slices. It is ok if they overlap. Mix the remaining ingredients and Lou over the bread. Sprinkle with pecans Cover tightly with plastic wrap and refrigerate overnight.

Remove from refrigerator for 10 minutes and then bake at 350 for 35 minutes.

Serve with warm syrup.

Adapted from Thegirlwhoateeverything


The second recipe for the weekend is Pepperoni Habanero Butter Bread
This one takes some time but it is well worth the effort.

Basic Pizza Dough
1/2 cup warm water (about 110 degrees)
1 tsp of sugar
1 packet of instant yeast (2 1/4 t.)
1 1/4 cup of room temp water
2 T. Olive oil
4 cups of bread flour
1 1/2 t salt

Measure the water into a 2 cup measuring cup. Sprinkle in the yeast and sugar. Let stand until the yeast dissolves and swells, about 5 minutes. Add room temp. Water and oil and stir to combine.

Place the flour and salt in mixing bowl. Stir with paddle. Briefly combine the dry ingredients on low speed. Slowly add the liquid ingredients and combine to mix at low speed until a cohesive mass forms. Stop mixer and replace paddle with a dough hook. Knead dough or 5 minutes. Put dough in an oiled bowl and cover with plastics wrap. Let rise until doubled (2 hours. Press dough to deflate it.

2 cloves of garlic, chopped
1 stick of butter
2-3 teaspoons of habanero sauce, (I use Blazing Saddles) or you can buy the Habanero butter at Orlando's in Lubbock...this is the best option.
Pizza dough (above)
6oz mozzarella cheese cut into small cubes
Pepperoni slices
Marinara sauce for dipping

Heat garlic, butter, and habanero sauce over medium heat until garlic browns.

Lightly brush inside of bundt pan with butter mixture.

Pull off large marble size pieces of dough and Flatten. Top each with pepperoni and cheese cube. Wrap the dough around the pepperoni and cheese. Pinch to seal

Brush each piece with butter mixture. I sprinkle with parmesan cheese.

Place all pieces the bundt pan. Pour remain butter on dough. Cover and let sit for 30 minutes. Preheat oven to 400 degrees. Bake for 35 minutes. Let sit for 10 minutes...good luck with that part. Serve with marinara sauce.

Adapted from Confections of Foodie Bride

Friday, October 21, 2011

Cubby's Pie

The motivation for this creation came from my son, Jacob who is absolutely crazy about pumpkin pie (I make him his very own pie every Thanksgiving) and apple butter.  Jacob has been known to order a bowl (the bigger size) of apple butter at Cracker Barrel and eat it with a spoon.   Jacob is blessed with two grandmothers who are fabulous cooks and they have kept him supplied in apple butter.  He does not share “his” apple butter.  Being the younger brother, Jacob has always done a great job sharing and giving to others but he draws the line when it comes to apple butter and pumpkin pie. 

This pie was a huge hit with Jacob.  As soon as he found out I had made the pie, he came over for a piece…granted it was 11:00 p.m.  (College students keep really strange hours).  Of course, I love when he visited even late at night.  He is the best for my confidence level.   Jacob gives the best hugs and complements.  He said the pie was the “bomb.com”.  I guess that is good!?  I had to make an extra one for Jacob’s boss because he was so excited about it.  Also, he took the rest of “his” pie with him. Tony and I barely got to taste it.  The pie has a very nice combination of spice and fruit.  I think it is definitely going to be a new holiday favorite at our house. 
Sorry I have not been blogging lately…Master’s class!  Enough said.  I promise to get back to regular posts.
Be blessed!


Apple Butter Pumpkin Pie
Ingredients:
       ·         Pie crust

Filling:
·         10 oz of solid pack pumpkin
·         1 cup of apple butter (I used Bama from the store but I can’t wait to try homemade)
·         ¼ cup of packed brown sugar
·         1 teaspoon of cinnamon
·         1 teaspoon of ginger
·         ¾ teaspoon of nutmeg
·         ¼ teaspoon of salt
·         2 eggs, beaten
·         1 can of sweetened condensed milk (not evaporated)

Streusal Topping:
  •    ¼ cup of cold butter
  •    ½ cup of flour
  •    ½ cup of brown sugar
  •    ½ cup of pecans
Directions:

  1. Preheat the oven to 375 degrees
  2. Prepare pie crust in a 9-inch pie pan as directed (do not bake)
  3. Combine filling ingredients in order listed in a mixer, blend well
  4. Pour the filling in prepared pie crust. Bake for  50-60 minutes until done
  5. Prepare streusel topping by combining sugar and flour, cut in butter until crumbly.  I do this with my paddle in my mixer.  Add pecans
  6. Take the pie out of the oven and place streusel topping on cooked pie filling, cover with foil and bake additional 15 minutes. 
  7. Cool  completely.

Make 7-8 servings.  
I got the original pumpkin pie recipe from my wonderful sister-in-law, Lori Sams.  I was going to use another recipe and tweak it but Lori’s recipe is Jacob’s all-time favorite so I just tweaked what was already amazing.  The apple butter is a wonderful addition.  Let me know if you have questions.  

Wednesday, August 10, 2011

Scarves and Fringe!

I am so excited about my new found loves!  My husband is a huge fan of the show, Fringe.  I have been watching with him but I was totally lost.  So I started at the beginning and WOW I love the show!  I am totally engrossed in the plot now.  However, true to form, I cannot have idle hands while watching tv so I decided to take up crocheting.  My mom taught me a few of the important stitches so it was not too hard to pick up. 

Aqua

Another shade of aqua

Black

Olive Green
I saw this really cute scarf on Pinterest and decided to try my hand at it.  The instructions are very simple and easy to understand.  Please check out Aesthetic Nest for the pattern.  Look for these scarves on my etsy soon. 

Thank you, Sarah Maxwell for being my beautiful model.

Look forward to more nifty crafts in the coming days...

Tuesday, August 2, 2011

New Toyz!

Sorry I have not updated recently…I think I am having a blog block! 
This week has been filled with many new toys.  I guess Santa came early.   My first new toy is a new exercise machine this weekend. 
It is a Pilates Power Gym.  I am hope this machine will kick my butt while toning and refining it. 

Another exciting toy…The Martha Stewart scoring board.  I have been wanting one for a long time especially after see so many tutorials where people use the board with great success.

My next cool toy (toys) is five Epiphany Craft Shape Studio along with the awesome epoxy bubble covers.
I also got the Round 14, oval, flower button and square.  Can't wait to use these nifty embellishments.  I will blog the results. 


Finally, the coolest toy of all…(pause for dramatic effect)  The new Sizzix Eclips.  I have not used it much yet but I know it is going to be amazing.  The Eclips announce recently that it is going to be compatible with Sure Cuts A Lot which is totally exciting.  The cutting I have done so far has been so much better than the bug. 
Yeah for birthday week. 

Upcoming blog:  A crochet scarf and other assorted crafts