"Now to him who is able to do immeasurably more than all we ask or imagine, according to his power that is at work within us, to him be the glory in the church and in Christ Jesus throughout all generations, forever and ever! Amen." Ephesians 3:20-21

Sunday, July 24, 2011

Visiting, Crafting, and Cooking. Life doesn’t get better than this!

Tony and I had an amazing weekend with my sister-in-law, Lori and nephew, Tyler from Georgia.  It was such a joy to have them visit.  I got to show Tyler around LCU on Friday and introduce him to several of our wonderful faculty and staff members. 

Since Pinterest has taken over my life recently…yes, I am seriously addicted.  I have discovered some wonderful new recipes.  The following is another one of my recent finds.  The Baked Brownie is claimed to be one of Oprah’s favorite things.  Well I am not sure about Oprah but it is definitely one of Shelley’s favorite things…hands down the best brownies I have ever made or eaten.  Again, I am glad cheat day is only once a week or I would be “huge-er”. 
The Baked Brownie...not sure why it is called the "baked" brownie...Don't you bake all brownies?


This recipe is adapted from the BrownEyed Baker.   

The Baked Brownie
Yield: 24 brownies
Prep Time: 30 minutes | Bake Time : 30 minutes

1¼ cups all-purpose flour
1 teaspoon salt
2 tablespoons dark unsweetened cocoa powder
11 ounces dark chocolate, coarsely chopped  (I used semi sweet chocolate chips)
3/4 cup  unsalted butter, cut into 1-inch pieces
4 T. of Heavy Whipping Cream
1 teaspoon instant espresso powder
1½ cups granulated sugar
½ cup packed light brown sugar
5 eggs, at room temperature
2 teaspoons vanilla extract

1. Preheat the oven to 350 degrees F. Butter the sides and bottom of a 9×13-inch glass or light-colored baking pan. Line the pan with parchment paper.
2. In a medium bowl, whisk the flour, salt, and cocoa powder together.
3. Put the chocolate, butter and instant espresso powder in a large bowl and set it over a saucepan of simmering water, stirring occasionally, until the chocolate and butter are completely melted and smooth. Turn off the heat, but keep the bowl over the water and add the sugars. Whisk until completely combined, then remove the bowl from the pan. The mixture should be room temperature.
4. Add 3 eggs to the chocolate mixture and whisk until combined. Add the remaining eggs and whisk until combined. Add the vanilla and stir until combined. Do not overbeat the batter at this stage or your brownies will be cakey.
5. Sprinkle the flour mixture over the chocolate mixture. Using a rubber spatula (not a whisk), fold the flour mixture into the chocolate until just a bit of the flour mixture is visible.
6. Pour the batter into the prepared pan and smooth the top. Bake in the center of the oven for 30 minutes, rotating the pan halfway through the baking time, until a toothpick inserted into the center of the brownies comes out with a few moist crumbs sticking to it. Let the brownies cool completely, then lift them out of the pan using the parchment paper. Cut into squares and serve.
7. Store at room temperature in an airtight container or wrap with plastic wrap for up to 3 days.
(Recipe adapted from Baked: New Frontiers in Baking)


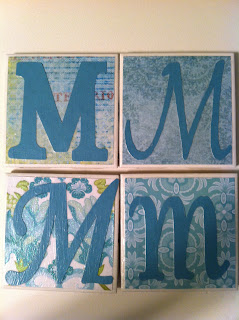
Tyler, Lori and I had fun making some more coasters.  Super easy and fun gifts. 


Have a blessed day!

Tuesday, July 12, 2011

Use a coaster...

Have you ever heard those words from your mother?  I am sure I have said it a few thousand times. 
In an attempt to come up with a really cool (and cheap) craft for camp, I started blog searching.  I came up with several ideas but this one caught my attention.  Tony and I did not get to go to camp (insert very sad face here), so I decided to create some coasters for myself (and practice for next summer's adventures).  I really think the kids will like this craft next summer and it is so versatile.   
Supplies:
Tiles
Scrapbook paper (4x4)
Initials  (3.50 tall)
Corkboard
Mod Podge
Sponge brush
Clear Acrylic Matte Sealer
Vinyl
Transfer tape

Coasters


I got the ceramic tiles at Lowes.  The white tiles are 4.25 x4.25 and very cheap $.16 each.  The brown tiles were on the discontinued table and were $.48 each.  I bought 10 of them and I wish I would have bought more.  When I went back to get more, they were all gone…bummer.   
Here is the scoop…
For the white tiles, I cut 4x4 pieces of scrapbook paper (I used the scraps from my previous project) and used Mod Podge to adhere them to the tile.  I cut out the four different P’s with matching cardstock using my cricut and used Mod Podge to finish.  After the tiles were dry, I gave them a couple of coats of clear matte finishing spray.   Finally, I attached corkboard to the back with hot glue I love how they look!   
For the brown tiles, I used brown vinyl and cut out the designs on my cricut using some cut files from Lettering Delights.  I used transfer tape to get the proper placement.  I put felt on the back of these tiles but the corkboard would work also.
I got this idea from Pinterest.  If you have not tried pinterest, you really should.  It is addicting.  Click here for the website that I used as my guide for white tiles.  Click here for the website I use for the brown tiles. 

Could be used as decorative also.

Makes a nice gift!


Saturday, July 9, 2011

“Cheat” Day Special

The first of July marked two months of Tony and I changing our eating habits.  We both have done extremely well and have really stuck to the eating plan.  We have successfully lost over 50 pounds (a small child) between the two of us.  We are not calling this a “diet” because that terminology tends to make us think that someday we can return to our old “bad” habits.  NO WAY!  We both feel healthier and have more energy.  I am not going to say that this has been easy, because it hasn’t.  However, we both feel like we are accomplishing something important for ourselves.

This brings me to today’s post…”Cheat” day!  Our new eating plan involves having one day a week where you can have anything you want.  We have found that this helps with “cravings”…we can have the food we crave but only on “cheat” day.  I truly believe that part of my failure in sticking with a “diet” has been denying myself foods that I want.  I would end up cheating too much and then eventually I would give up.  We have also found that “cheat” day tricks your body into thinking that it is not starving and it revs up your metabolism. 

The truth is I love to cook and create.  I am always looking for new recipes.  I found this recipe recently and knew right away that it would be a “cheat” day special.  Cinnamon Rolls are one of my favorite foods, (thanks to my sweet grandmother for this addiction) and I love pancakes, so what a perfect way to have both!  I am posting the recipe; however, I made some modifications which I will also note.  I hope you enjoy “cheating” as much as I did. 

Cinnamon Roll Pancakes

cinnamon roll pancakes

Yield: 4 servings (4 pancakes)   Shelley’s version (8 large pancakes)


Prep Time: 25 min
Cook Time: 10 min


Ingredients:

PANCAKES:                                                                 
1 cup all-purpose flour                                               
2 teaspoons baking powder                                     
1/2 teaspoon salt                                                         
1 cup milk                                                                      
1 Tablespoon canola oil                                             
1 large egg, lightly beaten                                         
                                                                                        
 Shelley’s  Version  
2 cups all-purpose flour
4 teaspoons of baking powder
1 teaspoon of kosher salt
6 T. of buttermilk powder *
1 cup of milk
1 cup of water
2 eggs

You could use 2 cups of buttermilk and omit the water and milk.  I am huge fan of buttermilk pancakes and it made them very light and fluffy.   

CINNAMON FILLING:  (I used the same amounts and I had plenty leftover for another batch, so you could double my recipe if you have a big family)                                  
1/2 cup butter, melted
3/4 cup brown sugar, packed
1 Tablespoon ground cinnamon
CREAM CHEESE GLAZE: (same here, I used the same amounts and had plenty leftover)
4 Tablespoons butter
2 ounces cream cheese
3/4 cup powdered sugar
1/2 teaspoon vanilla extract

directions:

1. Prepare pancake batter: In a medium bowl, whisk together flour, baking powder and salt. Whisk in milk, oil and egg, just until batter is moistened (a few small lumps are fine).
2. In a medium bowl, mix butter, brown sugar and cinnamon. Scoop the filling into a small zip baggie and set aside. You don't want this to remain super-liquidy. It's best if it becomes a consistency similar to toothpaste.
3. In a medium, microwave-safe bowl- heat butter and cream cheese until melted. Whisk together until smooth; whisk in powdered sugar and vanilla extract; set aside.
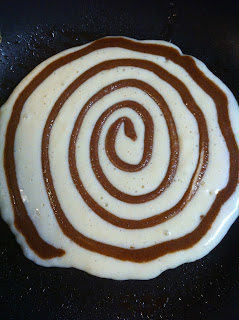
4. Heat large skillet over medium-low heat. Spray with nonstick spray. Scoop about 3/4 cup batter onto the skillet. Snip the corner of your baggie of filling and squeeze a spiral of the filling onto the top of the pancake. When bubbles begin to appear on the surface, flip carefully with a thin spatula, and cook until browned on the underside, 1 to 2 minutes more. Transfer to a baking sheet or platter and keep in a warm oven until ready to serve.
This is what they should look like before you flip them.

5. When ready to serve, spoon warmed glaze onto the top of each pancake.

tips:

*Keep the heat low or your pancakes might cook up too quickly. Don't flip them until you see those bubbles starting to pop on top. Flip them with a wide spatula so you can grasp the whole thing without batter and filling dripping all over the place!
*It's best if you pour the batter onto your skillet, wait a minute or so and then swirl the cinnamon onto the batter. That'll give it a chance to set a little before you add the swirl.
*If your baggie of filling begins to get too thick, just pop it in the microwave for a few seconds to soften it up again. On that same note, it shouldn't be too runny. The consistency of soft toothpaste is perfect. If it's melty and runny, it will tend to run all over your pancakes. Once you micro it, let it sit on the counter at room temp for a while until it thickens slightly.
Yum, yum  Enjoy your "cheat" day!

Friday, July 8, 2011

When life gives you lemons...

When life gives you lemons…
This week has been a very disappointing.  Tony and I were scheduled to go to Pine Springs Summer Camp for the week.  However, due to the drought and fire danger camp was cancelled for our week.  We are so sad.  We look forward to being with the kids for the whole year.  But we also know that the best decision was made for the safety of everyone involved.  
So life gave me lemons this week, so I decided to make something yummy!  I found this recipe through Pinterest. If you have not tried Pinterest, you should!  But I am warning you…it is addicting. 
Strawberry Lemonade Bars
From Baking Bites

Crust
1/4 cup sugar
1/2 cup butter, room temperature
1 1/2 cups all purpose flour
1/4 tsp salt

Filling
1 cup fresh lemon juice
2-3 tsp lemon zest
1/2 cup pureed strawberries (about 3/4 cup berries)
1 1/4 cups sugar
4 large eggs
1/4 cup all purpose flour
1/2 tsp baking powder
1/4 tsp salt

Preheat oven to 350F. Lightly grease a 9×13-inch baking pan.

Begin by making the crust.  In a large bowl, cream together sugar and butter, until smooth and fluffy. Working at a low speed, gradually beat in flour and salt until mixture is crumbly. Pour into prepared pan and press into an even layer. Bake for about 17 minutes, until set at the edges.

While the crust bakes, prepare the filling.  In the bowl of a food processor, combine lemon juice, lemon zest, strawberry puree, sugar and eggs and process until smooth. Add in flour, baking powder and salt, then pulse until smooth.  I used a blender.

Gently pour the filling over the hot crust when it has finished baking. Return pan to oven and bake for 23-26 minutes, until the filling is set (There will be a light colored “crust” on top from the sugar in the custard – nothing to worry about).

Sprinkle the bars with some powdered sugar.  Cool completely before slicing and use a damp knife to ensure clean slices.  Store bars in the refrigerator, especially on a hot day.  Makes 24 bars.

Saturday, July 2, 2011

Making the most of it!

 I am so thankful to have an extra day off next week.  I am going to spent most of the day crafting...I am not sure what it will be yet but I am sure that I will be inspired.  Gotta make the most of my free time before my next graduate class creeps up on me!  I was thinking about that today as I was creating and realized that as soon as my class starts...my crafting will cease for a few months.  Good thing is does not start until October.  Just two more graduate classes left and then I will be a Master.  Master of what?..I don't know.  It has been a fun journey but I am ready to be finished with this chapter of my life. 


Today and part of yesterday, I created a treat for great friends who is expecting in a month or so.  Lauren and Adam have blessed my life so much.  I can't believe they are going to be parents soon.  Little Laikyn is going to so blessed to have such amazing, loving parents.  I wanted to create something special for the nursery and needed inspiration.  I turned to my favorite svgcuts.com.  Of course, they had tons of cute cut files and I had to make a decision on what it would be.  I decided that since Laikyn's name is spelled differently it would be fun for her to have it in her nursery.  So I chose to tackle the 3D Alphabet SVG Kit.

Before I started on Laikyn’s name, I decided I would try my own initial first to see if it was very difficult...(remember, I had not read the instructions or watched the video yet.).  Needless to say, the S was harder than I expected as you can see from the picture. 
My first attempt

After watching the video tutorial and reading the instructions, I realized that the S is the hardest letter to master and Mary recommends that you start with other letters first.  I am such a hard-head sometimes.  But the S didn’t turn out that bad…and it is just for me anyway!  It will be my little momento to "not" reading directions first!

This is the final project for Laikyn.  I hope that her mommy likes it.  I tried to match the colors of the nursery while trying to create a vintage, feminine feel.


I used LetteringDelights for the butterfly. I made the crochet flowers with a little instruction from my crafty mom.  Please feel free to comment.  I am always open for suggestions.  Don't forget to check out SVGcuts.com if you are interested in really cool cut files.


Thursday, June 30, 2011

One of "those" days!

Have you ever had one of those days when you would just like to crawl back in bed and cover up your head?  Well today is one of them for me.  I am trying really hard to not be frustrated or grumpy but it is taking an extra measure of patience today.  I would love to be locked in my craftroom doing "my" thing, but alas I am at the office trying to work. 

Thinking about my family always cheers me up.  I have been so blessed...two amazing parents that love and support me, a incredible Godly husband, two fabulous boys who are the joy of my life, a wonderful daughter-in-law and many family and friends.  I guess I just needed to count my blessings to get a better perspective on my life. 

My mom is the most amazing woman I have ever met.  She is talented beyond measure.  I would love to post some of her crafty creations on my blog although she would put me to shame.  You should see some of the quilts she has made...so very talented.  I don't think there is a craft that she has not tackled.  She is a seamtress, a cook, a quilter, a painter, a "rug" hooker, and many more.  Some of her quilts are done entirely by hand...simply amazing!  I guess I got some of my "crafty-ness" from her.  She inspires me to work hard, to do my best, and live a faithfully.  On top of all my mom does, she is the primary caregiver for my grandfather (97 years old).  Can I just say that my mom is my Hero?..because she is, along with being my best friend.  I know I can always count on her to pull me through the rough spots and rejoice with me in the victories.  I am posting the bracelet I made for my mom for Mother's Day. 
Mother's Day Bracelet
The bracelet is from the Jewlery Shoppe Findings Collection.  I used DSWV spring brads for the insides of the jewels.  I filled in the rest of the bezel with ICE Resin.

Monday, June 27, 2011

H-O-T in Texas.

Yesterday, I spent most of the day being crafty...making cards, baby gifts, and other assorted paper crafts.  I got some really cool cut files from from SVG Cuts this weekend.  (Pictures coming soon!)   After several projects, I ran into a "craft" roadblock (actually I was bored with my paper selection.  I guess a trip to the scrapbook store is in my future.)  I decided it was time for a break from the craftroom and was time to be crafty in the kitchen.  I don't know which I love more, baking or crafting!  Both give me an outlet to be creative. Although being on a diet has curbed my desire to bake recently  because I live by the rule "If you bake it, you must eat it!"

It has been incredibly hot in Texas this summer...everyday has been in the 100's.  Yesterday, was at least 107 and there does not seem to be any relief in sight.  I wanted to make something cool and refreshing...Key Lime Pie was the winner. 
My Key Lime Pie
Recipe:  This recipe came from Key West, Florida. 

Crust
1 1/4 cup of graham cracker crumbs
3 T. sugar
1/2 cup of shredded toasted coconut
1/3 cup of melted butter

Mix together and place in a greased springfrom pan.  Bake at 350 for 10 minutes.  Cool completely

Filling
1 can of Eagle's Brand Milk
2-3 T. of key lime zest
2 egg yolks (no whites)
1/2 cup key lime juice

Mix together

Topping
1 pint of Heavy Whipping Cream
3 T. sugar

Whip until stiff peaks appear

Lightly fold 1/2 of the whipped cream into the filling and place in cooled crust.

Use the remaining whipped cream for the topping.  Garnish with key limes.   Freeze for a least 3 hours.  Store in the freezer.  Makes 10-12 slices. 

Enjoy!  Let me know what you think.